Hot & Cold Desserts
Welcome to Hot & Cold desserts! Though the bulk of the recipes will be frozen, and may need a ice cream machine to make, I say don't worry about it! With all the DYIs out there, there has to be one for churning and freezing ice cream or sorbet. My initial thought would be to set the cream, or puree mix in a shallow dish and set in the freezer, every half an hour, check it and mix it and repeat until desired consistency is achieved. In this section, we're going to focus in on cold desserts and working the pallet so that we are able to find a desirable taste to our desserts!
Enjoy!!
Enjoy!!
French Style Ice Cream
Ever hear of French Vanilla ice cream? Well, if you have, but never thought about it- I'll kindly explain it to you:
French Vanilla Ice Cream is not defined by the type or flavor of the vanilla, it is the style of ice cream. French Styled ice cream is a custard base- meaning it contains eggs that help bind the ice cream.
Many people are used to the american style ice cream that we have here in the United States. Originating in Philadelphia, American Style ice cream does not contain eggs, however, it contains a stabilizer. The need for a stabilizer is important because the butterfat in the cream acts as a thickener, and stabilizes the cream itself when being whipped. However, since the cream is being heated, then cooled by being churned- constantly moving in a freezing chamber, that butterfat will end up separating. Ever hear of whipped cream made into butter? That's because the cream has been over whipped, the same concept applies to American Style Ice Cream.
French Style Ice Cream is easier to work with because the eggs are doing all the work. When made right, the eggs- which contain lecithin- a natural emulsifier(agent that combines two substances that would normally not go together) that surrounds the butterfat and keeps it in place while it is being churned. The eggs add a smooth, rich taste to the ice cream, while in American Style, one is left to develop more flavors due to the lack of eggs.
The flavor of an ice cream should also be worked with rigorously. Have you ever noticed how something warm tastes better than something cold? If not, try it- cook something that can be eaten raw and eat the raw portion as well, with water in between. Not only does the aroma contribute to the ability of tasting the item, the warmth allows the taste buds to feel the object and actually taste it. Cold items will have to opposite affect; a frozen item will actually numb the taste buds, therefore subduing the tastebuds from actually tasting the food. That is why, when working with flavoring ice creams, sorbets, gravitas or any frozen desserts, the flavor should be incorporated to the fullest extent, not overpowering, but just enough so that it will taste good when out of the churning process.
French Vanilla Ice Cream
Ingredients: Yield: 2lbs
Milk Whole - 10 oz
Heavy Cream - 10 oz
Vanilla Bean - 1 ea
Granulated Sugar - 6 oz
Egg Yolks - 5 oz
MOP:
1. Gather all ingredients and equipment, scale all ingredients
2. Place milk, heavy cream, sugar and scraped vanilla bean and pod into heavy duty sauce pot
3. Whisk egg yolks to ribbon stage
4. Temper egg yolks with 1/3 of milk mixture
5. Return the mixture back to sauce pot and bring to 170-175°F
6. Cool on ice bath below 41°F in 6 hours to be sure no Bacteria can grow
7. Rest overnight to mature
8. Churn ice cream for 5 minutes, or until soft serve consistency.
9. Return ice cream to freezer for four hours to harden

|
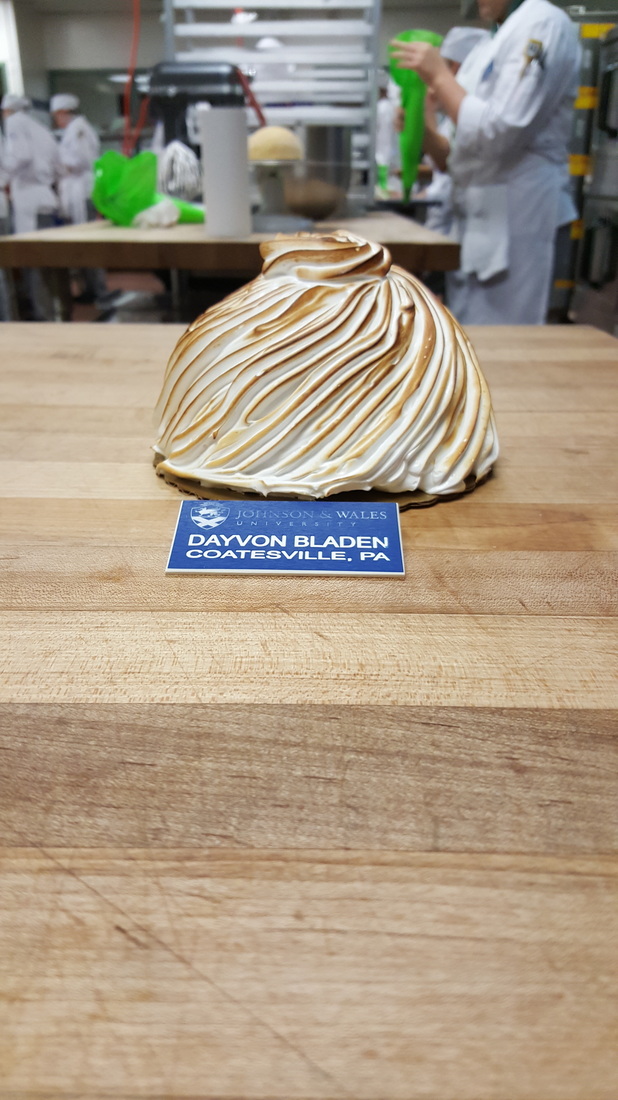
In this Baked Alaska is Jasmine Honey French Vanilla Ice Cream.
My favorite flavor of ice cream, however, is fall styled. I add 4 cloves, 2 cinnamon sticks, 2 allspice corns, 2 star anise, and 3 black peppercorns to a sauce pot and roast them over a high flame. When I start to smell the spices, I remove them from the heat, crush them and add them to my milk mixture. I put the lid on top of the sauce pot and allow it to steep for 5-10 minutes, or until I obtain the desired taste. After this, I follow the same steps as the the formula above. 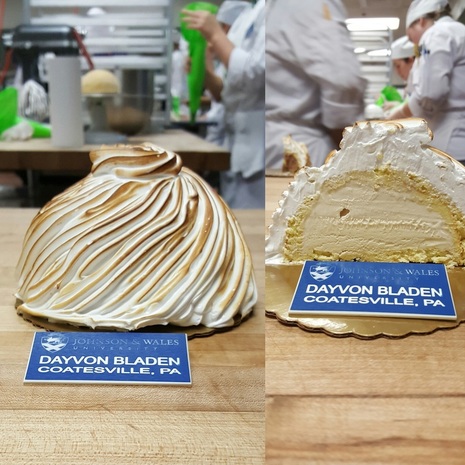
|
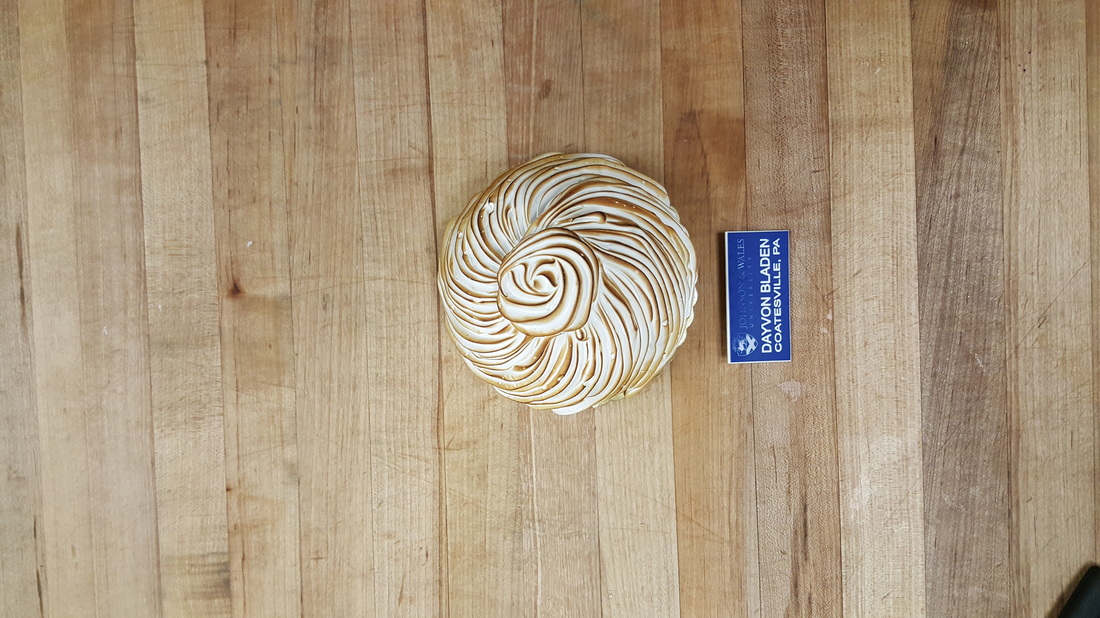
Baked Alaska
OH YEAH!!! Baked Alaska!!!
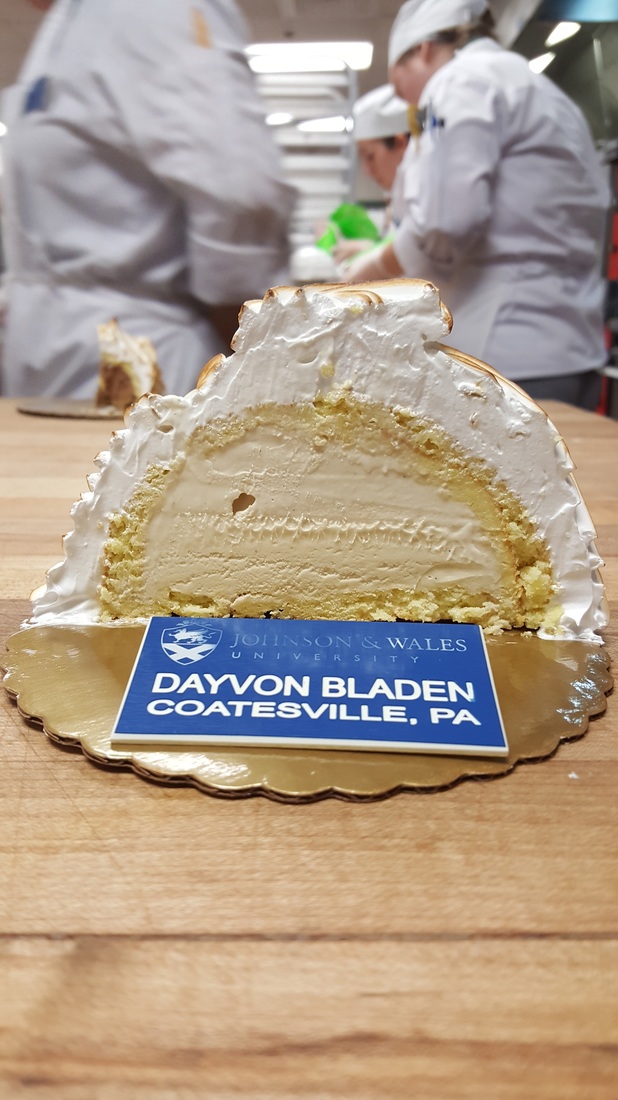
This delicious dessert is intriguing by the looks and by the texture and mouth feel. The silky yet crunchy baked exterior, the soft cake inner layer, and the smooth, rich ice cream that follows! The initial question one may ask- "What in the world, how did someone make this?!"
The answer is so simple, the method is even simpler. The cake and ice cream are molded together in a bombe mold. Pronounced "bomb," this is a traditional mold used for frozen desserts.
These beauties make creating these desserts a breeze, and they are relatively inexpensive.
The next question one may ask is "Why the name 'Baked Alaska'?"
Well, this is self-explanatory; Baked Alaska is a form of an oxymoron. Baked meaning warmed or heated, Alaska meaning frozen. The meringue on the outside of the dessert is the baked portion, the ice-cream on the inside is the frozen portion. Fannie Farmer coined the term way way way back when.
Baked Alaska
Italian Meringue
Ingredients: Yield: 1lb 6oz
Egg Whites- 10 oz
Granulated Sugar- 19 oz
Water- 4oz
Method of Prep:
1. Gather and scale all ingredients & equipment
2. Bring sugar and water to 250°F in a shallow sauce pot/pan
3. While sugar syrup is heating, whip egg whites to soft peaks
4. Immediately add sugar syrup- slowly and attempt to not get any on the sides of the mixer- to the egg whites while whipping on medium high speed, and continue whipping until stiff peaks are formed.
Jelly Roll Sponge Cake
Ingredients: Yield: 1lb 3oz
Whole Eggs- 6oz
Egg Yolks- 1.5oz
Granulated Sugar- 5.4 oz
Egg Whites- 3.5 oz
Sugar- 1 oz
Sifted Bread Flour- 2.5 oz
Method of Prep:
1. Gather and scale all ingredients & equipment
2. Whip whole eggs and egg yolks together with the 5.4oz sugar to ribbon stage
3. Beat egg whites with 1oz sugar to medium soft peaks
4. Fold the whites into the yolks slowly
5. sift flour in two additions- do not deflate the batter
6. Spread thinly and evenly onto prepared sheet pan(s)
7. Bake at 400°F for 5-8 minutes, rotating halfway through until lightly brown, cool completely
**Use the French Style Ice Cream Recipe for the ice-cream filling (using any flavors your pallet desires)**
Assembly of the Baked Alaska Bombe
1. To start, place bombe molds in the freezer for at least 2 hours before ready to assemble the Baked Alaska
2. Line the molds with plastic wrap with at least 3 inches excess for easy un-molding
3. Cut the sponge to necessary length, at least 2 inches larger than the circumference of the bombe for the inside layer, cut the sponge, with a cookie cutter, the same size of the bombe circumference for the bottoms- reserve for assembly
4. Place the sponge inside the mold gently and ease into place
5. Scoop ice cream into mold, pack the ice cream to ensure no air bubbles are present
6. Place the bottoms on top of the ice cream, wrap the excess plastic wrap on top of the bottom layer
7. Freeze overnight
8. When ready to serve, remove the molds from the freezer and take the Baked Alaska out of the molds, and onto cardboard circles
9. Fill a piping bag, fitted with a star tip, with the Italian Buttercream
10. Pipe desired design onto the Baked Alaska, immediately torch until desired shading is achieved
This dessert is sure to be a crowd pleaser! With its undoubted elegance, and delicious qualities, you and your guests are sure to have a wonderful end to the night!
Chocolate Gelato & Sorbet
These two items, I was debating on whether or not to combine, so I combined them for the sake of saving space!
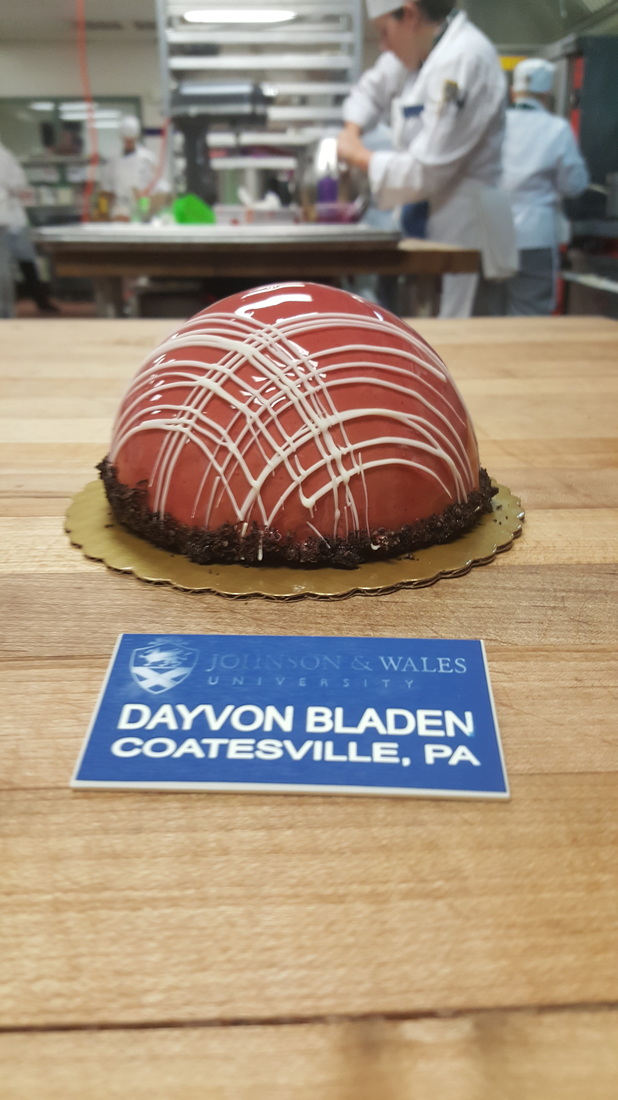
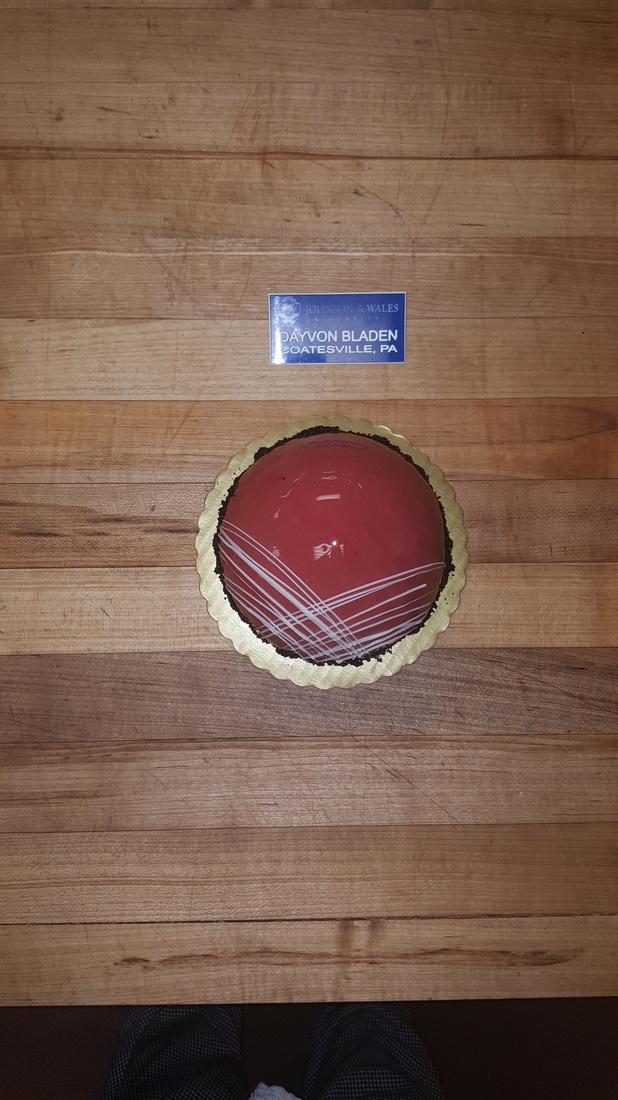
These two will be presented to you in the form of a Bombe Glacee ("Bomb Glas-ey"). A bombe glacee is any dessert that is frozen in a mold. The word bombe, meaning the mold, and the word glacee, meaning ice/frozen, or glazed. A bombe glacee is typically coated in some kind of sauce that shines and reflects, or a matte sauce.
For my bombe glacee, I prepared a Dark Chocolate Raspberry Truffle Gelato, paired with a Raspberry Mint Sorbet. The flavors paired well together and the texture and mouth feel was its own adventure. I had so much fun doing this because we rely so much on taste in this class. Who doesn't like tasting things?!
Chocolate Gelato **Dark Chocolate Raspberry Truffle Variation**
Ingredients: Yield: 2lb 10oz
Milk - 1lb 10oz
Heavy Cream - 3oz
Granulated Sugar - 9oz
Egg Yolks - 4oz
Dark Chocolate - 6oz
**Raspberry Puree - 300g**
Method of Prep:
1. Gather & scale all ingredients and equipment
2. Combine the milk, heavy cream and sugar and bring to a simmer
3. While heating, whisk the egg yolks
4. Once milk mixture is heated, temper the egg yolks with 1/3 of the milk, then return it to the pot and bring to 170°F
5. In a large bowl with the chocolate in it, pour the creme anglaise over the chocolate and mix until fully incorporated
6. Set on an ice bath and cool below 41°F in less than 6 hours
7. Put the gelato in the refrigerator and allow to mature overnight
**Combine the raspberry puree with the milk and cream (2nd step), follow the same steps through**
Raspberry Sorbet **Raspberry Mint Sorbet Variation**
Ingredients: Yield: 2lbs
Sorbet Syrup/Simple Syrup - 12 oz
Fruit Puree - 1lb 4oz
Lemon Juice & Zest - As Needed
**Salt**- 1/4tsp
**Mint**- 2oz
Method of Prep:
1. Gather and scale all ingredients and equipment
2. Combine syrup and puree, lemon juice can be added to balance sweetness
3. Freeze in ice cream machine
4. Remove from ice cream machine and store in airtight containers in freezer until needed
**Combine syrup, puree, salt, lemon juice, and mint in a sauce pot and bring to a simmer, remove from heat and steep for 15 minutes**
**Steep longer or add water to adjust flavor of mint**
Assembly of Bombe Glacee:
1. Place bombe molds in freezer at least 2 hours before use
2. Starting with the gelato, fill the molds 2/3 of the way full; working from the inside out, press and pull the gelato to fill the molds and remove some from the center to allow space for the next layer
3. Using a smaller mold, place the small mold in the center of the bombe, pushing down until it is level with the bombes outer edge
4. Clean and set in freezer for at least an hour to allow for hardening
5. Remove from freezer and remove the smaller mold
6. Insert the raspberry sorbet into the center where the mold was and push down to assure no air bubbles are present
7. Return back to freezer for at least 1 1/2 hours to allow for proper hardening and combination of ice crystals between the gelato and sorbet
8. Remove from freezer, using either a torch or warm water bath, dip the molds and un-mold them by pushing the outside of the bombe towards the center, creating a spherical motion with the bombe
9. Set the bombe on a card board circle and freeze once more
10. To glaze, set up a glazing station with a sheet pan, parchment paper, and cooling rack; fill a piping bag with either tempered dark chocolate or a special finishing glaze
11. Starting from the center of the bombe, in a circular motion, pipe the glaze onto the bombe and allow the glaze to fall down the sides, bang the sheet pan if necessary to remove any excess glaze
12. Decorate with desired design, cake crumbs on the bottom edge, white chocolate lines, macaroons.
13. Remove from the sheet pan and onto a gold circle, serve cold
Granita a.k.a Shaved Ice
Granita always sounds a lot more appetizing than shaved ice! A granita would serve as a great intermezzo or end of a meal. The flavors should be subtle, but strong enough for the consumer to know what they're eating! The flavors are brought on by an infusion. An infusion is a liquid, main item, heat, and time. With these factors combined, a dish can be changed from bland and boring, to bright and beautiful. This dessert is defined by garnishes, not so much that it becomes oberwhelming, but enough that the flavors are identifiable before being consumed. With an occasional berry, or zest of citrus, the granita becomes heightened to another level, without it, it just looks like someone put a glass of chipped ice in front of you, now who really wants that? Enjoy!
Ingredients: Yield: 738g
Water- 454g
Infusion- To taste
Simple Syrup- 284g
Method Of Prep:
1. Gather and scale all ingredients
2. Combine water and infusion (in this case, I did a fall flavored granita- ingredients will be found below) and heat to 180°F
3. Cover and let steep for 5 minutes
4. Evaluate flavor, if it is not strong enough, allow the infusion to steep for another 5 minutes, or add more of the ingredients
5. Add the simple syrup, allow to cool
6. Freeze in a shallow pan
Fall Style Granita (add these to preference)
Cinnamon, Allspice, Whole Blackpepper corn, Nutmeg, Cloves, Orange peel without pith, vodka
The vodka should not be more than 1/4 of the amount of water otherwise it will not freeze properly
|
|
Souffle Glace
This was not one of my personal favorites, however it was fun to make. The Souffle Glace is literally as it translates, iced souffle. It is a frozen version of a souffle, made to look like it, not completely the same. This one requires patience and a carefl hand. Almost any flavor combinations are possible with this one. The decorations are not all necessary for this dessert, it just fit so well with it!
Ingredients: Yield: 680g
Egg Yolks- 57g
Whole Eggs- 57g
Granulated Sugar- 113g
Heavy Cream- 454g
Flavorings- To taste
**Tequila, Lemon & Lime were used here**
Method Of Prep:
1. Gather and scale all ingredients
2. Combine eggs and sugar in a double boiler, whisking constantly, heat the mixture to 145°F exactly
3. Remove from heat and whip on electric mixer until thick and cool
4. Whip the heavy cream to soft peaks
5. Fold the cooled egg mixture into the cream
6. Prepare ramekins with an inch of parchment/acetate over the top edge of the ramekin to replicate the height of a souffle
7. Flavor as desired, pipe into ramekins, freeze
|

|
Banana Flambe
This has become one of my favorite desserts out there! The mouth feel, and abundant flavors are compelling and send me to another world! It is a classic dessert that seems easy enough, but with the cooking of the sugar, the flavor can drastically change within a matter of seconds if it is not cooked long enough or too much. The bananas should be slightly underripe due to the cooking. The flambe should last somewhat a longer time to fully cook out the alcohol- but that's all up to the consumer.
A technical dessert? I would not say so. Typically served with a heaping dollop of vanilla ice cream- which you now know how to make! This is the same as a Bananas Foster, however the usage of the different sugars, and tableside performance changes the name of it. Yet they remain the same- delicious!
Enjoy- and have lots of fun with this one!
Ingredients: Yield: 680g
Sugar | Granulated or Brown - 170g
Unsalted Butter- 170g
Bananas- 6ea
Dark Rum- 85g
Banana Liquer- 85g
Cinnamon Sugar- As needed
Method Of Prep:
1. Gather and scale all ingredients
2. Heat a sautee pan, add the sugar and butter and caramelize
3. Add the bananas and coat them with the caramel
4. Remove from heat, add the rum and ignite
5. Sprinkle the cinnamon sugar over the bananas while the flames are still visible
6. Off the heat, finsih with the banana liquer & top with a scoop of vanilla ice cream
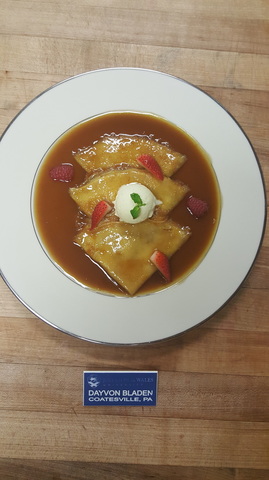
Crepes & Crepes Suzette
AHHH, Crepes! One of my personal favorite things to make and eat! The ultra thin style and subtle strength makes crepes a foundation of many modern and classic desserts. I don't have much to say about this dessert in particular because it did not speak to me as I thought it would. Crepes Suzette is a citrusy sauce the crepes "soak" in. It is delicious- if it's made right!
Crepe Batter
Ingredients:
Pastry Flour- 7oz
Granulated Sugar- 1.8oz
Salt- .25oz
Milk- 1lb 2oz
Whole Eggs- 12oz
Vegetable Oil/Melted Butter- 2oz
Vanilla Extract- 1oz
Method of Prep:
1. Gather and scale all ingredients
2. Combine all wet ingredients and sugar
3. Combine and sift all dry ingredients
4. Add the wet into the dry ingredients and blend together
5. Rest for 1 hour under refrigeration
6. In a crepe pan, or sautee pan, coat the bottom with clarified butter
7. Pour enough into the pan to coat the bottom and swirl until the bottom is cooked through
8. Flip carefully and cook until that side is done.
This process should not take longer than 3 minutes to be fully done. Literally a couple of seconds is all it takes to cook the crepe fully because it is so thin
Crepe Suzette Sauce
Ingredients: Yield: 482g
Orange juice & zest- 1ea
Lemon juice & zest- 1ea
Light Brown Sugar- 149g
Butter- 170g
Orange Juice- 57g
Orange Liquer- 70g
Rum- 70g
Method of Prep:
1. Gather and scale all ingredients
2. Combine orange and lemon juices and zests, brown sugar, butter, in a sauce pan
3. Boil sauce for three minutes, without stirring, add the crepes- 4/pan and coat evenly and add rum, ignite & flambe
4. Finish with orange liquer, and serve