Welcome to Cookies & Petit Fours!
Cookies & Petit Fours are small bite sized treats that almost everyone enjoys! As easy as they may seem to make, some can be as complex as decorating a cake! So enjoy the recipes, try them! Let me know what you think!!
Petit Four Glace

Instructions:
Frangipane Cake
Yield: 1106g
Almond Paste- 302g
Butter- 454g
Eggs- 302g
Cake Flour- 46g
Marzipan
Yield: 454g
6x Sugar- 182g
Almond Paste- 182g
Fondant- 45g
Glucose- 45g
Dipping Fondant
Yield: 726g
6x Sugar- 680g
Corn Syrup- 28g
Water (Room Temp)- 113g
Almond Extract- 5g
Method of Prep
Frangipane Cake
1. Gather ingredients and equipment, scale ingredients.
2. In the bowl of stationary mixer, mix the butter until soft, remove from bowl and set aside.
3. Place the almond paste in the bowl of the mixer, beat until soft, adding one or two eggs as needed, scrape well.
4. When the almond paste & butter are the same consistency, add the butter to the almond paste and incorporate.
5. Mix of medium speed to aerate.
6. Add the remaining eggs in thirds and scrape well.
7. Fold in the sifted flour by hand and incorporate.
8. Batter must be spread evenly onto a very flat, greased & papered 1/2 sheet pan.
9. Bake for approx. 30 mins or until golden brown in 350°F oven or 325°F convection oven.
Marzipan
1. Gather ingredients and equipment, scale ingredients.
2. Place the ingredients in the bowl of an electric mixer in this order
1. 6X Sugar 2. Almond Paste 3. Fondant 4. Glucose
3. Mix with paddle until ingredients are combined.
5. Remove from the mixer, work the marzipan into a smooth piece.
6. Place marzipan in a tightly wrapped plastic bag to avoid drying
Dipping Fondant (Make after Petit Fours are assembled and cut)
1. Gather all ingredients & equipment
2. Place all ingredients in a small pot and heat to 98°-100°F. Do not go over 110°F, the fondant will become dull- not shiny.
3. If the fondant becomes "cold-thick," then re-warm, do not heat over 98°F.
To assemble Petit Fours
1. Remove Frangipane cake from the pan, make sure there are no cracks or breaks in the cake.
2. Cut the frangipane into quarters, cutting as evenly and perfectly as possible. Save two of the quarters as they will not be needed.
3. With either raspberry (most traditional), apricot, or orange jam, put a thin layer on top on one of the quarters of the frangipane cake.
4. Carefully place the second quarter on the top of the first layer.
5. Put another layer of the jam on the top of the second layer, make this layer somewhat thinner than the last.
6. With the marzipan- working on a very clean surface, cut a 4 oz piece and roll out thin.
7. Carefully flip your layered frangipane cake onto the marzipan- with the second layer facing down, the jam should be touching the marzipan.
8. Trim off any excess marzipan, if it is clean, save it, if there is an remnants of the jam, discard the marzipan as it can not be used again.
9. Carefully flip the petit four cake back over, making the marzipan face up, you should be left with a clean cut surface on the top of your petit four cake.
10. Freeze the cake or chill for at least 24 hours to allow the layers to fully set, and to give the marzipan time to adhere to the jam.
11. After your petit fours are set, remove from chilling area, cut the cake into 1" x 1" pieces, being as precise and neat as possible.
12. You may need to chill these pieces again for dipping- just until completely set.
13. To dip, angle the pot that was used, and with a fork, gently dip the petit four into the fondant, allowing the fondant to fully coat the cake, pull out of the fondant and allow the excess to drip off.
14. Place the coated petit four on prepared glazing rack (sheet tray with parchment & the rack).
15. This would be the time to garnish your petit four with your fondant/marzipan decorations.
16. After the petit fours have dripped off any excess fondant, and are completely set, place them into small papers and they are ready to be served.
I know that was a lot, but it really is not that difficult to do. I remember doing these in my Tech School. They were probably one of the most challenging tasks I would have to take on while I was there, but with the simple yet elegant techniques I have learned here at Johnson & Wales, they have become a breeze. My favorite part about making these was probably molding my marzipan decoration, and dipping them in the fondant. I became so focused in those moments, and I felt like an actual chef! These are so much fun and they are so easy to do. If you give them patience, time, and love, you will be greeted with an excellent product. If I were to do these again, I would definitely take my time on them, get them perfect! I would make my garnish smaller so the petit four can be the star of the show. They are so small but so pretty to look at. If I was able to, I would do these every day! This is a must try!
Frangipane Cake
Yield: 1106g
Almond Paste- 302g
Butter- 454g
Eggs- 302g
Cake Flour- 46g
Marzipan
Yield: 454g
6x Sugar- 182g
Almond Paste- 182g
Fondant- 45g
Glucose- 45g
Dipping Fondant
Yield: 726g
6x Sugar- 680g
Corn Syrup- 28g
Water (Room Temp)- 113g
Almond Extract- 5g
Method of Prep
Frangipane Cake
1. Gather ingredients and equipment, scale ingredients.
2. In the bowl of stationary mixer, mix the butter until soft, remove from bowl and set aside.
3. Place the almond paste in the bowl of the mixer, beat until soft, adding one or two eggs as needed, scrape well.
4. When the almond paste & butter are the same consistency, add the butter to the almond paste and incorporate.
5. Mix of medium speed to aerate.
6. Add the remaining eggs in thirds and scrape well.
7. Fold in the sifted flour by hand and incorporate.
8. Batter must be spread evenly onto a very flat, greased & papered 1/2 sheet pan.
9. Bake for approx. 30 mins or until golden brown in 350°F oven or 325°F convection oven.
Marzipan
1. Gather ingredients and equipment, scale ingredients.
2. Place the ingredients in the bowl of an electric mixer in this order
1. 6X Sugar 2. Almond Paste 3. Fondant 4. Glucose
3. Mix with paddle until ingredients are combined.
5. Remove from the mixer, work the marzipan into a smooth piece.
6. Place marzipan in a tightly wrapped plastic bag to avoid drying
Dipping Fondant (Make after Petit Fours are assembled and cut)
1. Gather all ingredients & equipment
2. Place all ingredients in a small pot and heat to 98°-100°F. Do not go over 110°F, the fondant will become dull- not shiny.
3. If the fondant becomes "cold-thick," then re-warm, do not heat over 98°F.
To assemble Petit Fours
1. Remove Frangipane cake from the pan, make sure there are no cracks or breaks in the cake.
2. Cut the frangipane into quarters, cutting as evenly and perfectly as possible. Save two of the quarters as they will not be needed.
3. With either raspberry (most traditional), apricot, or orange jam, put a thin layer on top on one of the quarters of the frangipane cake.
4. Carefully place the second quarter on the top of the first layer.
5. Put another layer of the jam on the top of the second layer, make this layer somewhat thinner than the last.
6. With the marzipan- working on a very clean surface, cut a 4 oz piece and roll out thin.
7. Carefully flip your layered frangipane cake onto the marzipan- with the second layer facing down, the jam should be touching the marzipan.
8. Trim off any excess marzipan, if it is clean, save it, if there is an remnants of the jam, discard the marzipan as it can not be used again.
9. Carefully flip the petit four cake back over, making the marzipan face up, you should be left with a clean cut surface on the top of your petit four cake.
10. Freeze the cake or chill for at least 24 hours to allow the layers to fully set, and to give the marzipan time to adhere to the jam.
11. After your petit fours are set, remove from chilling area, cut the cake into 1" x 1" pieces, being as precise and neat as possible.
12. You may need to chill these pieces again for dipping- just until completely set.
13. To dip, angle the pot that was used, and with a fork, gently dip the petit four into the fondant, allowing the fondant to fully coat the cake, pull out of the fondant and allow the excess to drip off.
14. Place the coated petit four on prepared glazing rack (sheet tray with parchment & the rack).
15. This would be the time to garnish your petit four with your fondant/marzipan decorations.
16. After the petit fours have dripped off any excess fondant, and are completely set, place them into small papers and they are ready to be served.
I know that was a lot, but it really is not that difficult to do. I remember doing these in my Tech School. They were probably one of the most challenging tasks I would have to take on while I was there, but with the simple yet elegant techniques I have learned here at Johnson & Wales, they have become a breeze. My favorite part about making these was probably molding my marzipan decoration, and dipping them in the fondant. I became so focused in those moments, and I felt like an actual chef! These are so much fun and they are so easy to do. If you give them patience, time, and love, you will be greeted with an excellent product. If I were to do these again, I would definitely take my time on them, get them perfect! I would make my garnish smaller so the petit four can be the star of the show. They are so small but so pretty to look at. If I was able to, I would do these every day! This is a must try!
French Macaroons!!!

Intructions:
Yield: 2390g
Cookies
Almond Flour- 600g
6X Sugar- 600g
Fresh Egg Whites- 220g
Food Coloring of choice - N/A
Granulated Sugar- 600g
Water- 150g
Fresh Egg Whites- 220g
Swiss Meringue Buttercream
Yield: 908g
Egg Whites- 170g
Granulated Sugar- 340g
Butter (Soft)- 442g
Method of Prep
Cookies
1. Mix and create a paste with the first three ingredients
2. Start whipping egg whites until foam forms
3. Cook the water and sugar to 248°F and pour over the whipped egg whites to create an Italian Meringue.
4. Mix until the meringue reaches 104°F and slowly incorporate it into the paste.
5. Macaroon the mixture to create soft and shiny paste.
6. With a piping bag, pipe the macaroons to 1 1/4" circles on prepared sheet, lined with either parchment paper or a silpad
7. Bake on a double baking sheet pan for approx. 11 minutes in deck oven at 330°F or in the convection oven at 280°F.
Swiss Meringue Buttercream
1. Gather all ingredients & equipment, scale ingredients
2. In a bowl of an electric mixer, place over hot water bath, while whisking constantly, heat the egg whites and sugar until the sugar dissolves, 110°-130°F
3. Place the bowl on the mixer fitted with the whip attachment, and whip until the meringue is completely cool and stiff peaks form
4. After meringue is cool and the stiff peaks have formed, replace the whip with the paddle and place on medium speed.
5. Add the softened butter in additions, allowing the butter to fully incorporate before adding again.
6. At this point, any flavorings can be added to heighten the buttercream, traditionally- a tsp of vanilla extract, or half of scraped vanilla bean, and a pinch of salt are added.
Assembling Macaroons:
1. With the cool shells for your macaroons, match them up by size. The closer to identical, the better.
2. Fill the macaroons so that there is still some space left between the edge of the shell and the filling.
3. Place the top of the macaroon on the top of filling, and push down until the filling almost pushes out of the macaroon.
4. Do not overfill the macaroons, and do not push too hard on them.
These were so much fun to do. There are so many possibilities when it comes to these macaroons. They can be colored any color, and filled with almost anything. If one is trying to show off their creative genius, this is the product they would want to work with. Although these can be somewhat temperamental, if they are executed correctly, the macaroons become a work of art. When I was in tech school, there was a catering that needed to be done, and the customers wanted some type of bite-sized treat. So we decided to do macaroons. It took a couple attempts, however, the finish product was amazing. With pumpkin spice, chocolate hazelnut, and raspberry lemonade, the customers were wowed. The amount of flavor that can be packed into these small treats is unbelievable. These are best served at functions with a high guest count, they are sure to be a crowdpleaser.
Financiers
Ingredients:
Yield: 815g
6x Sugar- 270g
Almond Flour- 86g
Trimoline (Invert Sugar)- 21g
Egg Whites- 213g
Brown Butter- 129g
Cake Flour- 86g
Cinnamon- 3g
Baking Powder- 1.9g
Method of Prep:
1. Gather & Scale ingredients
2. Sift Powdered Sugar
3. Add almond flour, trimoline, egg whites, & brown butter, mix well
4. Sift 3x's cake flour, cinnamon & baking powder
5. Coat molds with clarified butter & bread flour
6. Pipe batter into molds, top with either whole almonds or piped jelly or jam
7. Bake at 350°F deck oven or 325°F convection oven.
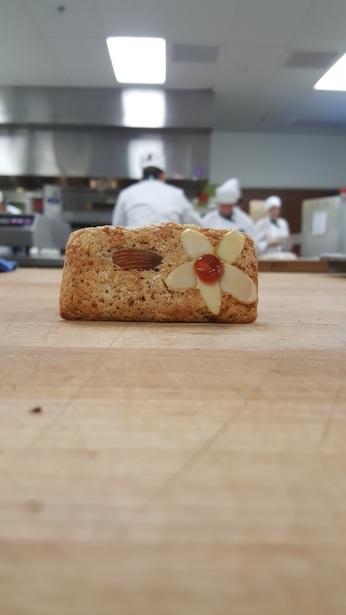
Financiers! Derived from the word finance, financiers were a popular cake like cookie in the financial district of France. Financiers are very light, cakey and can be made into almost any flavor imagined. The texture of the cookie is tremendously satisfying it makes me want to reach for more! And the design possibilities are endless! Be as creative as possible!
Yield: 815g
6x Sugar- 270g
Almond Flour- 86g
Trimoline (Invert Sugar)- 21g
Egg Whites- 213g
Brown Butter- 129g
Cake Flour- 86g
Cinnamon- 3g
Baking Powder- 1.9g
Method of Prep:
1. Gather & Scale ingredients
2. Sift Powdered Sugar
3. Add almond flour, trimoline, egg whites, & brown butter, mix well
4. Sift 3x's cake flour, cinnamon & baking powder
5. Coat molds with clarified butter & bread flour
6. Pipe batter into molds, top with either whole almonds or piped jelly or jam
7. Bake at 350°F deck oven or 325°F convection oven.
Financiers! Derived from the word finance, financiers were a popular cake like cookie in the financial district of France. Financiers are very light, cakey and can be made into almost any flavor imagined. The texture of the cookie is tremendously satisfying it makes me want to reach for more! And the design possibilities are endless! Be as creative as possible!
Madelines
Instructions:
Yield: 24g
Madeline
Unsalted Butter- 130g
Whole Eggs- 3ea
Egg Yolk- 1ea
Granulated Sugar- 120g
Kosher Salt- pinch
A.P. Flour- 175g
Baking Powder- 1 tsp
Orange Zest- 2 whole
Orange Glaze
6x Sugar- 150g
Orange Juice- 2T
Method of Prep:
Madelines:
1. Brown the butter, prepare pans- spray and flour pans oven temp 400°F
2. Whisk: eggs, yolk, sugar & salt until frothy & batter thickens
3. Sift flour & baking powder, fold into batter
4. Add orange zest to cooled butter, fold into batter, keep batter cold overnight or chill for 1.5 hours
5. Cool and glaze
Orange Glaze:
1. Combine sugar and orange juice until semi-thick glaze forms.
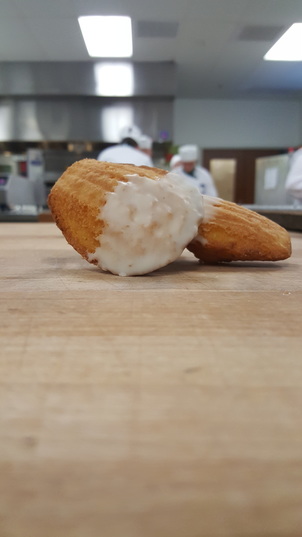
Although these madeleines came out of the oven a little toasty, they were still amazingly delicious! I could not believe what I was eating. Like a mini cake. The French definitely know what they're doing when it comes to making these cookies!
Yield: 24g
Madeline
Unsalted Butter- 130g
Whole Eggs- 3ea
Egg Yolk- 1ea
Granulated Sugar- 120g
Kosher Salt- pinch
A.P. Flour- 175g
Baking Powder- 1 tsp
Orange Zest- 2 whole
Orange Glaze
6x Sugar- 150g
Orange Juice- 2T
Method of Prep:
Madelines:
1. Brown the butter, prepare pans- spray and flour pans oven temp 400°F
2. Whisk: eggs, yolk, sugar & salt until frothy & batter thickens
3. Sift flour & baking powder, fold into batter
4. Add orange zest to cooled butter, fold into batter, keep batter cold overnight or chill for 1.5 hours
5. Cool and glaze
Orange Glaze:
1. Combine sugar and orange juice until semi-thick glaze forms.
Although these madeleines came out of the oven a little toasty, they were still amazingly delicious! I could not believe what I was eating. Like a mini cake. The French definitely know what they're doing when it comes to making these cookies!
Cantuccini
Ingredients:
Yield: 2 Bars, 12"x2"
Pastry Flour- 250g
Baking Powder- 1 tsp
Orange or Lemon Zest- 1 tsp
Sugar- Granulated- 165g
Honey- 1 Tbs
Eggs- 2 ea.
Almond Extract- 1/2 tsp
Kosher Salt- 3/4 tsp
Inclusions**- 125g
Method of Prep:
1. Whisk in small bowl: flour, baking powder & zest
2. Whisk in separate larger bowl: sugar, honey, eggs, almond extract
3. Blend the dry ingredients into the wet, using rubber spatula, until just combined, add inclusions once the mixture holds together
4. Empty bowl contents onto parchment paper, dividing into 1/2, shape 2 logs, roughly 12"x2"
5. Bake in 350°F deck oven for 30 min, until golden brown
6. Cool for 10 min, slice using sharp serrated knife into 3/4" slices
7. Bake for another 10 minutes, flip each slice, then bake again for approximately 8 minutes- cantuccini should be dry.
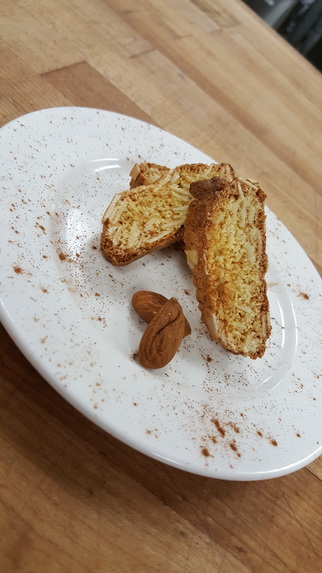
This cookie is so great! I believe that this cookie can be served with almost any meal, my ultimate favorite would be for breakfast when I can dunk it straight into my coffee! My inclusions were slide, blanched almond slivers, which added just the right amount of texture without making the cookie entirely too crunchy. Try any inclusions you would like, make the Cantuccini your canvas!
Yield: 2 Bars, 12"x2"
Pastry Flour- 250g
Baking Powder- 1 tsp
Orange or Lemon Zest- 1 tsp
Sugar- Granulated- 165g
Honey- 1 Tbs
Eggs- 2 ea.
Almond Extract- 1/2 tsp
Kosher Salt- 3/4 tsp
Inclusions**- 125g
Method of Prep:
1. Whisk in small bowl: flour, baking powder & zest
2. Whisk in separate larger bowl: sugar, honey, eggs, almond extract
3. Blend the dry ingredients into the wet, using rubber spatula, until just combined, add inclusions once the mixture holds together
4. Empty bowl contents onto parchment paper, dividing into 1/2, shape 2 logs, roughly 12"x2"
5. Bake in 350°F deck oven for 30 min, until golden brown
6. Cool for 10 min, slice using sharp serrated knife into 3/4" slices
7. Bake for another 10 minutes, flip each slice, then bake again for approximately 8 minutes- cantuccini should be dry.
This cookie is so great! I believe that this cookie can be served with almost any meal, my ultimate favorite would be for breakfast when I can dunk it straight into my coffee! My inclusions were slide, blanched almond slivers, which added just the right amount of texture without making the cookie entirely too crunchy. Try any inclusions you would like, make the Cantuccini your canvas!
Oreos?!
Ingredients:
Yield: 8 3" cookies
Cookie:
Pastry Flour- 259g
Unsweetened Cocoa- 87g
Baking Soda- 1.6g
Butter- 227g
Kosher Salt- 6g
Granulated Sugar- 161g
White Chocolate Filling:
White Chocolate- 125g
Butter- 15g
Heavy Cream- 125g
Method of Prep:
Cookie:
1. Gather all ingredients + equipment.
2. Sift the flour, cocoa and baking soda together.
3. In a mixer fitted with a paddle, cream the butter on medium low until smooth. Add the sugar + salt until fluffy. Scrape down the bowl.
4. Add the dry ingredients in 2 addition, mix on low speed for 15 – 30 sec after each until just combined, then mix until the dough begins to comes together.
5. Push the dough together with your pastry scraper, push into a 6” block. Wrap, label, refrigerate for 1 hour, until firm.
6. Roll dough between 2 pieces of parchment paper (this prevents cracking). 7. Refrigerate rolled sheets until firm enough to cut.
8. Place cookies carefully on a parchment lined sheet pan.
9. Bake in a 325°f deck oven, 300°f convection oven for 15 – 17 min.
10. Cool.
White Chocolate Filling:
1. Melt white chocolate + butter, stirring constantly.
2. Bring cream to a simmer.
3. Pour cream over chocolate/butter mixture. Chill overnight.
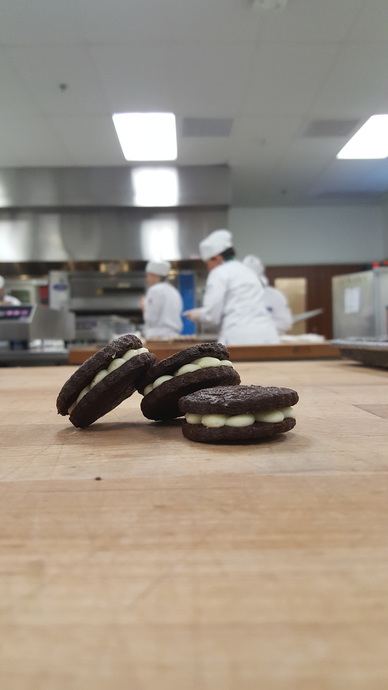
Oh my gosh, did we just make OREOS?! These cookies have a lighter filling, however, in all, the texture of the cookie has a heavy flavor to it. These would be great to serve to a hungry crowd, or just to have as a party favor. A small refreshing treat that no one can resist!
Yield: 8 3" cookies
Cookie:
Pastry Flour- 259g
Unsweetened Cocoa- 87g
Baking Soda- 1.6g
Butter- 227g
Kosher Salt- 6g
Granulated Sugar- 161g
White Chocolate Filling:
White Chocolate- 125g
Butter- 15g
Heavy Cream- 125g
Method of Prep:
Cookie:
1. Gather all ingredients + equipment.
2. Sift the flour, cocoa and baking soda together.
3. In a mixer fitted with a paddle, cream the butter on medium low until smooth. Add the sugar + salt until fluffy. Scrape down the bowl.
4. Add the dry ingredients in 2 addition, mix on low speed for 15 – 30 sec after each until just combined, then mix until the dough begins to comes together.
5. Push the dough together with your pastry scraper, push into a 6” block. Wrap, label, refrigerate for 1 hour, until firm.
6. Roll dough between 2 pieces of parchment paper (this prevents cracking). 7. Refrigerate rolled sheets until firm enough to cut.
8. Place cookies carefully on a parchment lined sheet pan.
9. Bake in a 325°f deck oven, 300°f convection oven for 15 – 17 min.
10. Cool.
White Chocolate Filling:
1. Melt white chocolate + butter, stirring constantly.
2. Bring cream to a simmer.
3. Pour cream over chocolate/butter mixture. Chill overnight.
Oh my gosh, did we just make OREOS?! These cookies have a lighter filling, however, in all, the texture of the cookie has a heavy flavor to it. These would be great to serve to a hungry crowd, or just to have as a party favor. A small refreshing treat that no one can resist!
Lemon Bars
Ingredients:
Shortbread Crust:
Bread Flour- 252g
Confectioners Sugar- 94g
Butter (Room Temp)- 171g
Pure Vanilla Extract- 1/2 tsp
Salt- 12 tsp
Lemon Filling:
Sugar- 330g
Bread Flour- 76g
Eggs- 160g
Fresh Squeezed Lemon Juice- 150g
Lemon Zest- 2g
Method of Prep:
1. Preheat oven to 375°F. Lightly grease a 9"X13" sheet pan (Double above formula for 1/2 sheet pan). Line with parchment paper, letting the ends hang over.
2. Make shortbread crust: using a paddle attachment, cream the butter & sugar. Add flour, vanilla salt. Mix until combined. Press dough evenly into prepared pan. Bake until just barely golden brown around edges - 20-25min.
3. After crust is removed from oven, lower temp to 325°F. Cool crust completely in pan.
4. Make the lemon filling: combine sugar & flour in medium bowl. Add eggs whisk to form paste. Add lemon juice, zest, & stir to combine. Pour into cooled crust.
5. Bake until the filling is set.
6. Allow to cool completely in the pan before cutting.
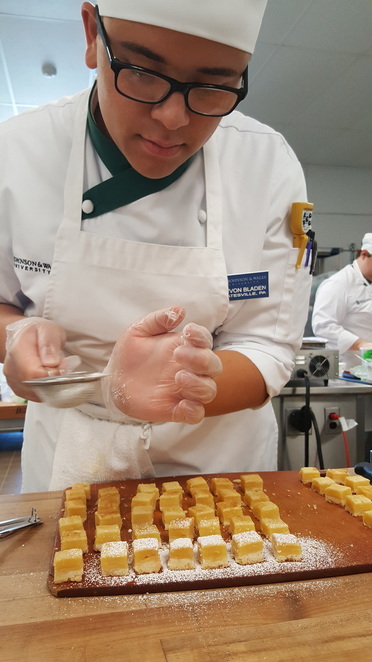
7. Cut into bars & dust lightly with confectioners sugar.
These lemon bars have been cut 1"x1". The best part of these small treats is that they're one biters! And the refreshing taste seems to revitalize the pallet. These are a strong recommendation to anyone wanting something easy and simply delightful!
Shortbread Crust:
Bread Flour- 252g
Confectioners Sugar- 94g
Butter (Room Temp)- 171g
Pure Vanilla Extract- 1/2 tsp
Salt- 12 tsp
Lemon Filling:
Sugar- 330g
Bread Flour- 76g
Eggs- 160g
Fresh Squeezed Lemon Juice- 150g
Lemon Zest- 2g
Method of Prep:
1. Preheat oven to 375°F. Lightly grease a 9"X13" sheet pan (Double above formula for 1/2 sheet pan). Line with parchment paper, letting the ends hang over.
2. Make shortbread crust: using a paddle attachment, cream the butter & sugar. Add flour, vanilla salt. Mix until combined. Press dough evenly into prepared pan. Bake until just barely golden brown around edges - 20-25min.
3. After crust is removed from oven, lower temp to 325°F. Cool crust completely in pan.
4. Make the lemon filling: combine sugar & flour in medium bowl. Add eggs whisk to form paste. Add lemon juice, zest, & stir to combine. Pour into cooled crust.
5. Bake until the filling is set.
6. Allow to cool completely in the pan before cutting.
7. Cut into bars & dust lightly with confectioners sugar.
These lemon bars have been cut 1"x1". The best part of these small treats is that they're one biters! And the refreshing taste seems to revitalize the pallet. These are a strong recommendation to anyone wanting something easy and simply delightful!
Oatmeal Raisin Pecan Cookies
Ingredients: Yield: 1000g
A.P Flour- 142.4g
Sugar- 142.4g
Brown Sugar- 160g
Unsalted Butter (Room Temp.)- 142.4g
Eggs- 62.4g
Pure Vanilla Extract- 4.8g
Salt- 2.24g
Cinnamon- 4.8g
Rolled Oats- 196.8g
Baking Soda- 2.24g
Raisins & Pecans- 142.4g
Method of Prep:
1. Place flour in a medium bowl. Sift in the cinn & baking soda, add salt.
2. Cream butter and sugars together.
3. Add eggs & vanilla, mix on low speed until just combined.
4. Add the dry ingredients in 2 additions, pulse at low speed until just combined.
5. Add oats.
6. Pulse in raisins & pecans (toasted pecans are recommend).
- Refrigerate dough for 15-30 mins
- Scoop evenly using a #30 scoop
- Bake at 350°F for 12-15 mins
Yield- approx. 30 cookies
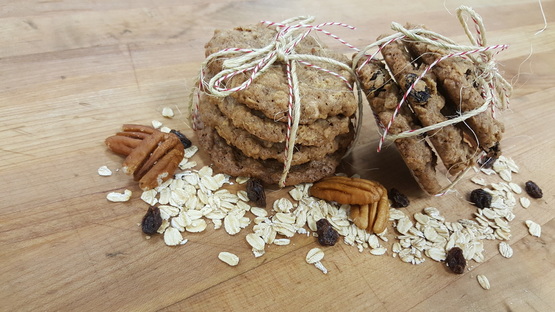
This is the Oatmeal Raisin Pecan cookie. Expect some spread with this cookie. The cookie should have a relatively chewy/somewhat crips texture. The oatmeal raisin pecan cookie is the first cookie I had the opportunity to make here at Johnson & Wales so it means a great deal to me!
A.P Flour- 142.4g
Sugar- 142.4g
Brown Sugar- 160g
Unsalted Butter (Room Temp.)- 142.4g
Eggs- 62.4g
Pure Vanilla Extract- 4.8g
Salt- 2.24g
Cinnamon- 4.8g
Rolled Oats- 196.8g
Baking Soda- 2.24g
Raisins & Pecans- 142.4g
Method of Prep:
1. Place flour in a medium bowl. Sift in the cinn & baking soda, add salt.
2. Cream butter and sugars together.
3. Add eggs & vanilla, mix on low speed until just combined.
4. Add the dry ingredients in 2 additions, pulse at low speed until just combined.
5. Add oats.
6. Pulse in raisins & pecans (toasted pecans are recommend).
- Refrigerate dough for 15-30 mins
- Scoop evenly using a #30 scoop
- Bake at 350°F for 12-15 mins
Yield- approx. 30 cookies
This is the Oatmeal Raisin Pecan cookie. Expect some spread with this cookie. The cookie should have a relatively chewy/somewhat crips texture. The oatmeal raisin pecan cookie is the first cookie I had the opportunity to make here at Johnson & Wales so it means a great deal to me!
